
Hibiscus plants are famous worldwide for their vibrant flowers. Propagating the Hibiscus plants is one of the most economical ways of having more of them. Besides, it is a fun project and ideal for beginners.
Hibiscus can be propagated in various ways, like stem cutting, grafting, air layering, and through seeds. Stem cutting is the most common way in which you can clip a 5-6 inch stem, dip the end into a rooting hormone, and plant it in the soil. You can place the cutting in water too.
This guide will help you understand the procedures of propagating Hibiscus plants in different methods. Besides, you will be able to know other things about propagation and the silly mistakes to avoid.
When is the best time to propagate Hibiscus plants?
Begin propagating Hibiscus plants when the weather is warm, but the sunlight is less intense.
The best time for propagating the Hibiscus plant is late spring or early summer.
Once you propagate Hibiscus plants, they will require warmth and lots of bright filtered sunlight when the growth procedure starts.
Don’t propagate Hibiscus during the cold months of winter.
Since Hibiscus grows very slowly or becomes dormant, there won’t be any blooms.
Besides, pruning for propagation during winter can stress the plant.
However, you can propagate in winters only if you have a heat mat or a greenhouse to control the temperature.
The Hibiscus plants are native to regions where the climate is warm and sunny with temperatures over 100°F.
So, if you try and propagate Hibiscus during low temperatures or frosty weather, the Hibiscus will rarely have any chances of survival.
What are the different ways of propagating the Hibiscus plant?
There are many ways to propagate Hibiscus plants:
- Stem cuttings
- Root cutting
- Air layering
- Seeds
Out of all these, stem cutting is the most common one.
It is easy and has a high chance of success.
Even beginners can do it.
Another propagation method is grafting.
Expert nursery workers perform this process under special care and maintenance in the greenhouses.
Grafting is a complicating process for home gardeners.
If anything goes wrong, then propagation won’t be successful.
Materials needed for propagation
Propagation can be a little confusing for the first time, but you can master it once you become acquainted with the steps.
You can either try an easy one or all the methods for the experience.
The first step is to know the supplies needed for successful propagation for easy propagation.
- A sharp knife or pruner to make a clean cut. A blunt cut can open a path for the fungus and result in infections.
- Rubbing alcohol to disinfect the tools.
- A pot with drainage holes. It is better to start propagation in a container. Once they develop into well-established plants, shift them to the soil.
- A healthy plant, of course, for a quick and successful propagation.
- A glass jar if you want to perform water propagation.
- Distilled or rainwater to water the soil and for water propagation.
- Rooting hormone to encourage faster root growth
- Ideal soil mix for stimulating growth
- Sphagnum moss to be used during air layering
- Aluminum foil and brown paper to cover the sphagnum moss
- Some threads like tape, floral wire, twine to tie the brown paper, and aluminum foil
How to propagate Hibiscus from stem cuttings?
You can use different cuttings to propagate Hibiscus plants like tip, medium wood, and hardwood cuttings.
Hibiscus is usually propagated with the tip or softwood cuttings.
These are the newly grown stems and are not mature yet.
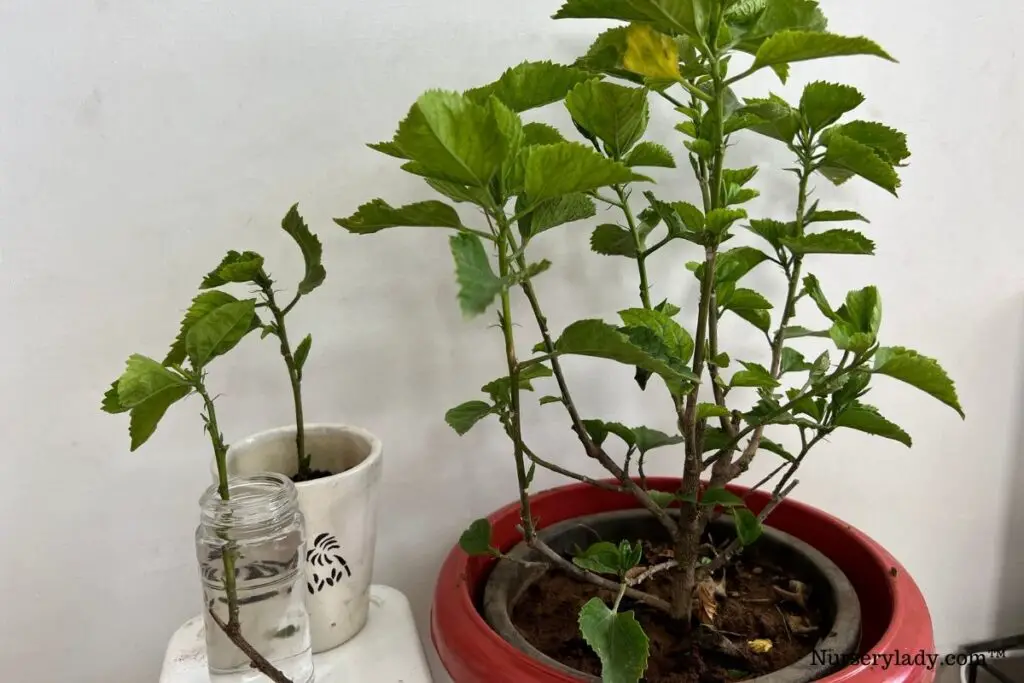
With softwood cuttings, you can propagate Hibiscus both in soil and water.
Softwood cuttings are taken in the spring and summer.
The next type of cutting is the medium wood or semi-hardwood cuttings.
These stems have just started to mature.
These cuttings are taken in the autumn.
The nursery workers generally take these cuttings to develop multiple stocks of a particular variety.
The last type of cutting is the hardwood cuttings taken in the last month of winter or early spring.
These cuttings are taken from the stems that have become mature and hard.
You can collect them at the time of normal full pruning time.
Now, let’s get into the steps.
Steps for propagation:
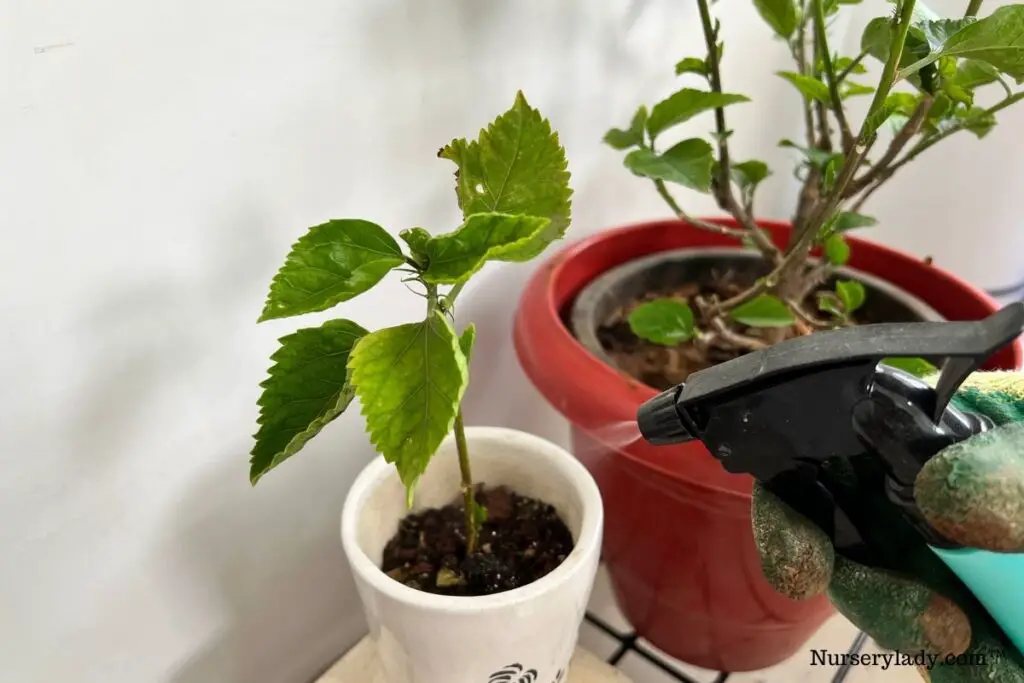
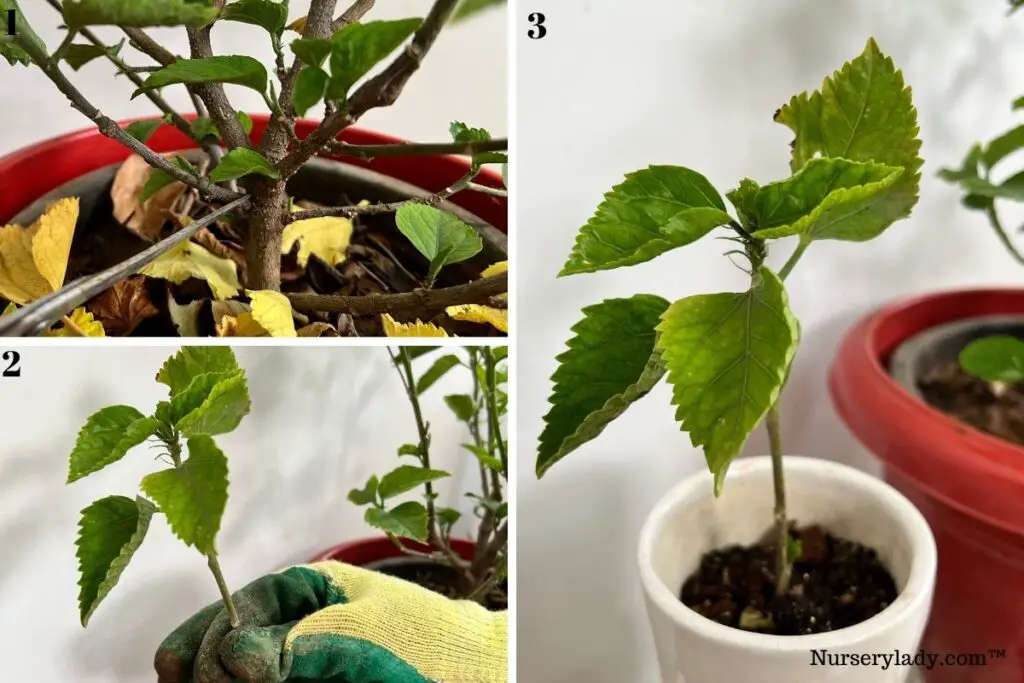
- First, find the ideal type of stem for cutting.
- Take cuttings around 6 to 8 inches long.
- Cut at a 45-degree angle below the leaf node.
- Now, remove the big and long leaves from the stem. Leave 2-3 small leaves at the tip of the branch. It will help to improve the oxygen level when new growth appears.
- Don’t tear the leaves. Always use a pruner to cut the leaves.
- Expose the cambium layer at the bottom of the stem by scratching it around 1-2 inches. Scrape 1-2 sides of the stem. It will increase the area of root growth.
- Dip the stem endings into rooting hormone. It will encourage faster root growth.
- Don’t touch the cut endings with your hand, as that can transfer oil and prevent the working of the rooting hormone. Directly dip the ending into the rooting hormone.
- Place the cutting into the container with an ideal soil mix having sand, compost, and peat moss in equal amounts.
- Water the soil to moisten it.
- Place the pot at a location having bright indirect sunlight, 40-50% humidity, and temperatures around 72-80°F.
- You can also cover the cutting with a bottle or plastic to maintain the ideal humidity level. But make sure it doesn’t hold back the leaves from growing.
- When you find new growth in the cutting, it is time for transplanting.
Water propagation
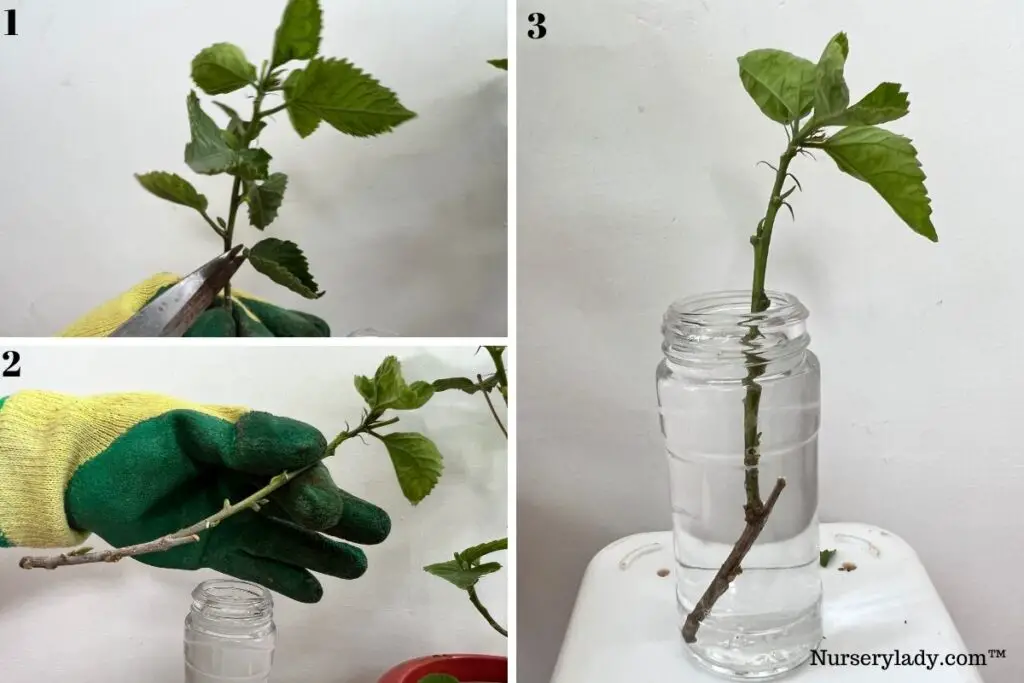
- After dipping the cutting into rooting hormone, place the cutting in the jar filled with water.
- Use a glass jar to track the root growth and the water condition.
- Make sure that the water is distilled or rainwater. Tap water contains lots of harsh minerals, so it is better to avoid it. If you don’t have other options than tap water, let it sit for 2-3 days or 24 hours.
- Place the jar in a location with bright indirect sunlight. Change the water every 2-3 days.
- Once new growth appears and the roots become light tan colored, transplant the cutting into the soil. Generally, the transplantation should be done after 6 to 8 weeks.
- In water propagation, only softwood cuttings will show better results.
- For soil propagation, you can use all types of cutting. The methods are more or less the same for all cuttings.
Things to remember before propagation
- Choose the cutting from the plant you want to have. It will vary depending on factors like a flowering plant, non-flowering plant, size, color, hardiness zones, etc.
- Choose a plant that has lots of effective stems and dark green leaves.
- Make sure that the plant is healthy and disease-free.
- Though you can choose any cutting, softwood cuttings have chances of faster rooting because they are new growth. Other cuttings will root slowly.
- Choose the stem as thick as a pencil and should measure 5-6 inches.
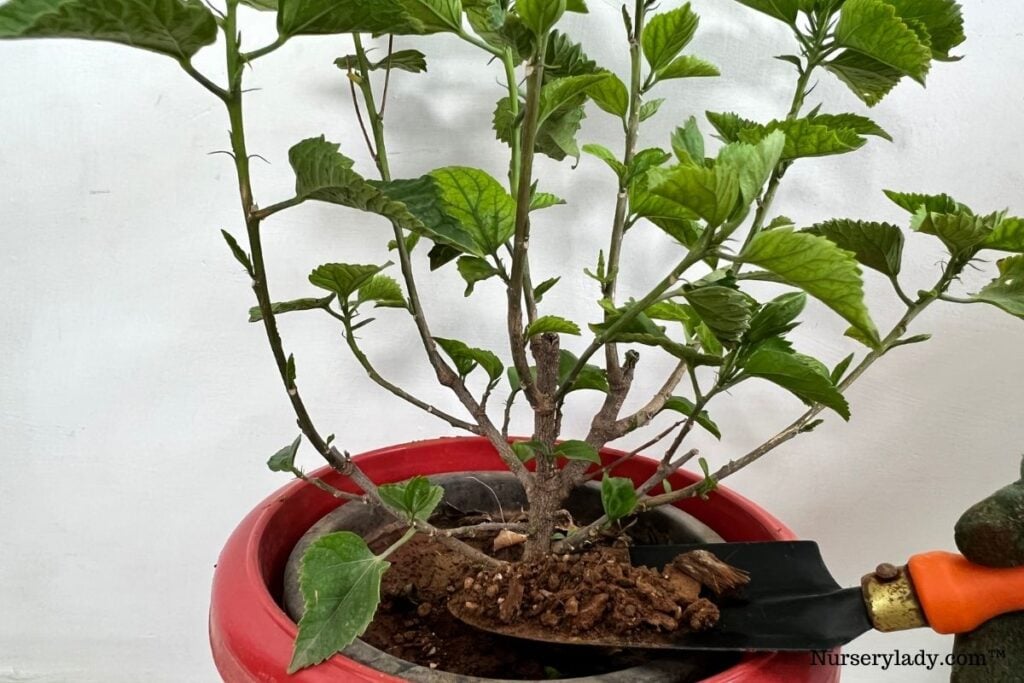
How to propagate Hibiscus from root cuttings?
Some Hibiscus varieties like dark red-flowered “Rubi” can be propagated through root cuttings.
Do this in the fall.
Here are the steps:
- Take the plant out of the soil without hurting the root ball.
- Remove the thick, fleshy roots and put them in moist peat. The roots should be as fat as your finger.
- Cut the roots horizontally into multiple pieces, around 4 inches long.
- Plant the cuttings about 0.5 to 0.75 inches deep into the soil.
- You don’t have to water them but make sure that the growing medium remains moist.
- Now, keep the container in a cool place.
- Ensure that the cuttings remain in a frost-free area until December and January. The roots shouldn’t dry out completely within this time.
- Once the root cuttings produce new shoots, shift them to a bright location.
How to propagate Hibiscus by air layering?
In air layering, propagation is done using an existing stem for a new plant without cuttings.
- Choose a mature, healthy plant for this propagation.
- Cut the stem bark in two places and keep a distance of 1 inch in between.
- Now, remove the outer layer of the bark and the cambium layer to expose the white layer of the healthy wood.
- Apply some rooting hormone to the exposed part with a clean brush.
- Take a handful of sphagnum moss, moisten it, and set it in the cut portion. Soak the sphagnum moss for at least half an hour before setting for adequate moisture level.
- Cover and pack the place and sphagnum moss with clear plastic.
- Seal the plastic at the top and bottom ends to prevent the air from entering it.
- Cover the plastic with aluminum foil and then brown paper. It will trap the moisture and maintain ideal humidity for root development.
- Check the rooting after 4-5 weeks.
- If you find sufficient root growth, cut the branch below the root ball and transplant it to a new location or new pot.
- Continue caring for the plant – partial shade, enough watering, and regular fertilization after 4-6 weeks.
- Don’t remove the sphagnum moss immediately while transplanting, as some small roots will remain tangled with the moss.
How to propagate Hibiscus from seeds?
Since it takes a lot of time to gather the seeds and witness new seedlings, seed propagation is not performed nowadays.
But, it can give excellent results, and you can enjoy it as a fun project or as an experience.
The plant will produce the seed pods after two months of pollination.
You have to observe the pollination timing during the growing periods.
But, the weather and surrounding conditions must be favorable.
The temperature must remain around 60-80°F, with 50-60% humidity.
Along with that, you should start seed propagation in containers and use soil that contains perlite.
Seed propagation works better in Hardy Hibiscus than the Tropical Hibiscus.
- First, collect the seeds from the seedpods and rough them up slightly.
- Get grain sandpaper and knick the seeds with a sharp disinfected knife. This will help in better water absorption.
- Now place the seeds in a damp paper towel. Or, fill a shallow dish with room temperature water to soak them overnight.
- Take a container and fill it with the seed potting mix.
- Make a small hole using a toothpick and place the seed 1/4th inch deep. Cover it with a thin layer of soil. You can also place multiple seeds, but you should transplant once the seedling emerges to maintain its size.
- If you want to place the seed a little deep because of its size, add more soil to cover it.
- Now, moisten the soil by spraying water. Keep the soil moist until the seedlings have sprouted. Maintain bottom heat to encourage faster root growth.
- It will take 2 to 4 weeks to sprout. Sometimes, it might take 6 to 18 months to grow.
- When the seedlings have grown few leaves, the risk of frost damage in the new plant is over. Now, harden your plant and take them outside. Acclimatize them for a few hours daily.
- Transplant them outside in your garden at a location that receives daily 6 to 8 hours of sunlight and has well-drained soil.
Ideal soil mixes for propagating Hibiscus
Having an ideal soil mix for Hibiscus plants helps the plant to propagate and root successfully.
Below are some ideal soil mixes:
- 2 parts potting soil, 2 parts peat moss, and 1 part perlite
- Equal parts of composted bark, composted manure, and coarse peat with little vermiculite
- 50% peat, 45% composted bark and 5% perlite
- 2 parts garden soil, 1 part compost, and 1 part sand
Also read: What Kind Of Soil Does A Hibiscus Plant Like? (+Best Soil Mix)
Final words
Propagation is a great way to get more Hibiscus plants without buying them. You can enjoy multiple plants bearing colorful, vibrant blooms brightening up your garden every spring.
Though there are many ways to propagate Hibiscus, stem cutting is the easiest one. Besides, there are high chances of success.
Stem cuttings can give you an exact clone plant of the mother. You can give both the mother and the propagated plant the same care and maintenance.
Always choose a healthy, disease-free plant for propagating. If your plant has recently recovered stress or is recovering, let it get well completely and then take steps for propagation. Otherwise, you won’t find good results after propagating.
Reference: Wikipedia, ASPCA, Louisiana State University Agricultural Center, American Society for Horticultural Science, Tropical Hibiscus by Texas A&M University, Sciencedirect.